


openSPOT User Manual
This product has been discontinued. Official support is no longer available. Click here for the new openSPOT3!
Note that this user manual is for openSPOT firmware version v142.
If you have questions, please ask them on our forum or in email. We only have these two official support platforms (we don’t have official support on Facebook or other platforms).
Components
Accessories
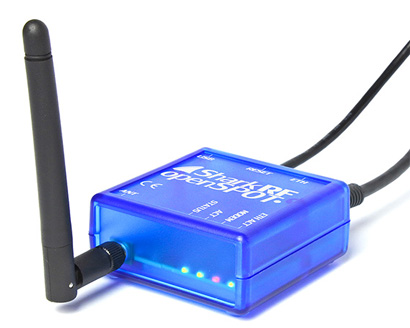
The openSPOT package comes with an AC/USB power supply, an antenna, a USB and an Ethernet cable. These are all you need to operate openSPOT, however, you will need a web browser on a computer, tablet or mobile phone for initializing openSPOT settings, but after that, openSPOT can work standalone. Please use only the supplied power supply. (The usage of inappropriate power supplies voids the warranty)
Interfaces
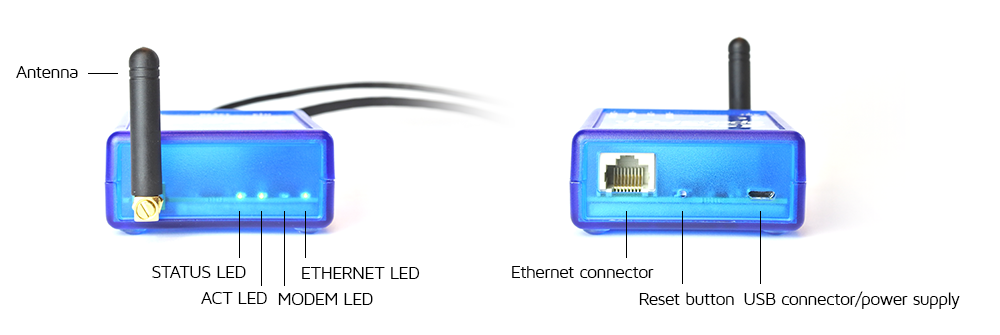
LED states
- The ETHERNET LED is wired to the Ethernet controller, so it’s always green when an Ethernet cable is plugged in, and always blinking green, when it’s communicating. It works even when openSPOT is running the bootloader.
- The STATUS LED shows openSPOT’s connector status:
- Continuously red: connector not set.
- Blinking red: connector is trying to connect.
- Continuously green: connector is connected.
- ACT LED states:
- Slow blinking green: modem CPU found and is ready.
- Fast blinking green: modem CPU communicating with main CPU.
- Fast toggling between red and green: modem CPU firmware upgrade is in progress.
- Slow blinking red: modem CPU version mismatch. Firmware upgrade needed.
- Fast blinking red: modem CPU not found. Try to reboot openSPOT. If it doesn’t help, try to upgrade firmware.
- MODEM LED states:
- Unlit: modem is idle, or searching for sync.
- Green: modem is receiving.
- Red: modem is transmitting.
- Fast toggling between red and green: modem CPU firmware upgrade is in progress.
If the ACT LED is unlit, and both the STATUS and MODEM LEDs are blinking fast green, openSPOT is in bootloader mode. If main CPU firmware upgrade is in progress, the STATUS LED is toggling fast between red and green states, if modem CPU firmware upgrade is in progress, the MODEM LED is toggling fast between red and green states. If you reboot openSPOT and the ACT and STATUS LEDs are blinking red by turns, you’ve uploaded a firmware file with an incorrect hardware version. Retry firmware upgrade with the correct firmware upgrade file. For further information, refer to the Firmware upgrade section below.
Note that the ACT LED is also acting as a “heartbeat”, if it’s blinking very slowly that means the main CPU is very busy at the moment. It can happen when the web interface is loading, and openSPOT is in a call simultaneously. Calls always have higher priority, so the loading of the web interface can be slow during an ongoing call.
First steps
- Screw on the antenna.
- Connect the USB cable to a computer or to the AC/USB power supply.
- Connect openSPOT to your local area network with the Ethernet cable.
- Open http://openspot.local or http://openspot/ in your browser. Note that you may have to enter openSPOT’s IP address, if you can’t open the page (for ex. on Android and iOS phones, which don’t support MDNS or LLMNR – see the note below).
- Log in with the default password openspot (all letters are lower case).
- Follow instructions in the Connectors section below to set up connecting to a server/reflector.
- If you want to use openSPOT with a DMR radio, determine the best DMR demodulation mode for your transceiver by using DMR AutoCal, or by changing DMR demod modes manually on the Modem page. See DMR AutoCal’s usage in the Connectors section below.
- If you want to use openSPOT with a C4FM radio with half deviation turned on, determine the best C4FM half deviation demodulation mode for your transceiver by using C4FM Half Deviation AutoCal, or by changing C4FM Half Deviation demod modes manually on the Modem page. See C4FM Half Deviation AutoCal’s usage in the Connectors section below.
- Follow the steps below on how to set up your transceiver to use with openSPOT.
Here are some tips on how to find openSPOT’s IP address:
– You can look at the DHCP clients list in your router’s web interface.
– If voice announcements are enabled in the openSPOT, you can query the active IP address:
– DMR: start a call to the IP address query DMR ID (by default it’s 9001). In DMR mode, voice announcements are sent to TG9, so to hear them, make sure you have TG9 in your radio’s RX group list.
– D-STAR: start a call to the repeater info callsign …….A (7 spaces and an A, replace dots with spaces)
– C4FM: enter the Special command DTMF code (by default it’s *) followed by DTMF code B
– On Android and iOS phones, you can use MDNS/Bonjour discovery applications to find openSPOT’s IP address. Recommended apps for Android are Zentri Discovery or ZeroConf Browser.
Here’s a tutorial video on connecting openSPOT to the BrandMeister network:
The method is the same for other connectors.
How to configure your transceiver
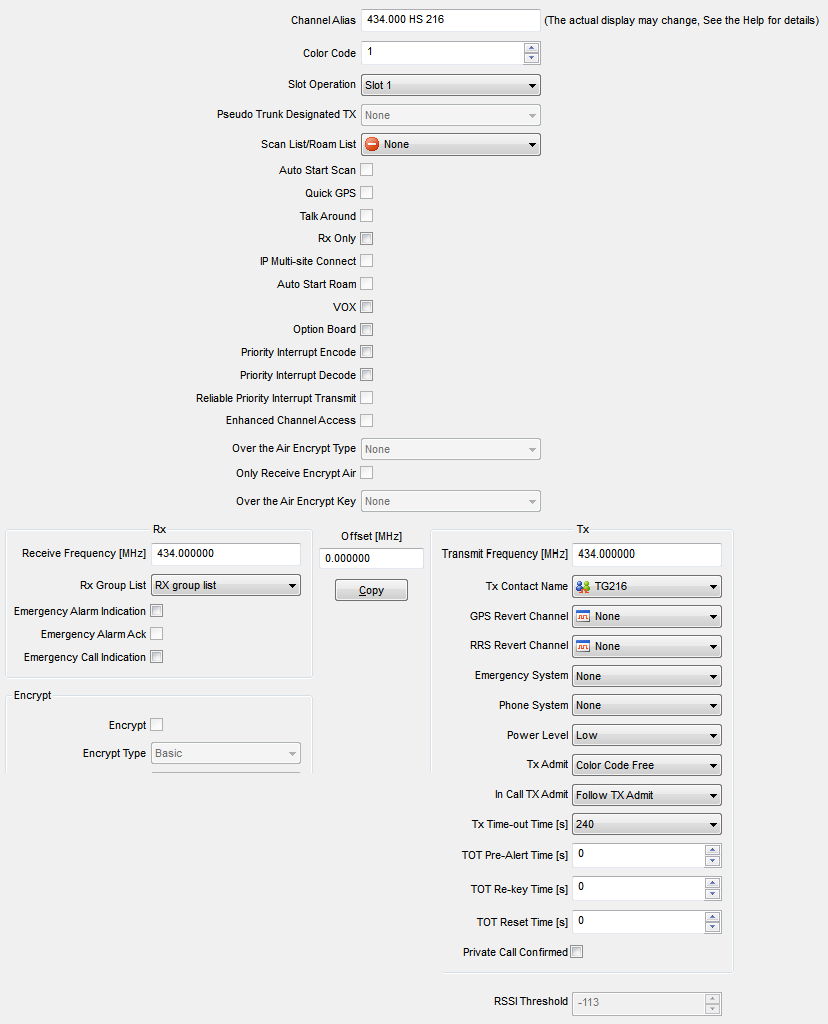
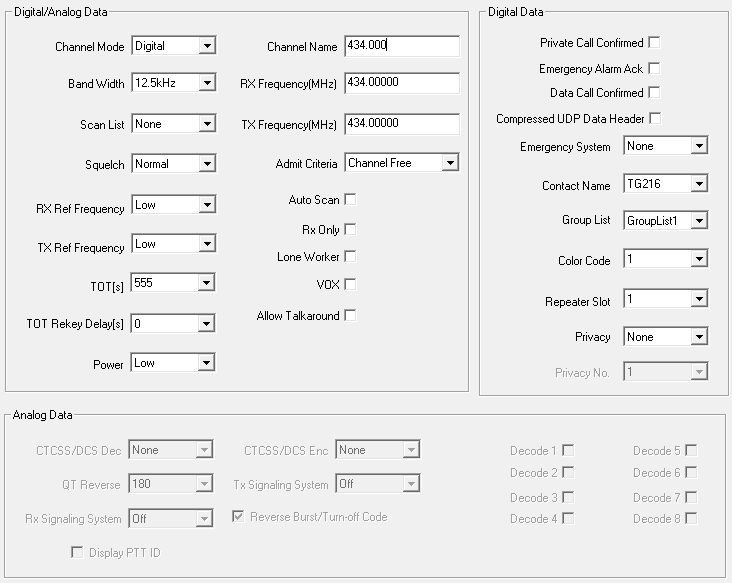
DMR radio setup
- Set up a simplex channel (with same RX and TX frequencies), timeslot is irrelevant (you can set it to 1 – they are not used in simplex mode).
- Set the channel’s color code to openSPOT’s color code (by default it’s 1, it can be changed on the Settings page, DMR settings section).
- Set the TX contact to the talkgroup you want to talk on. If you want to use a reflector, or Homebrew call rerouting, set it to TG9.
- Create an RX group list and add TG9 to it. Assign this RX group list to the previously created simplex channel. This way you’ll be able to hear openSPOT’s voice announcements, which will be sent to TG9.
- Make sure you ran DMR AutoCal or change DMR demod modes manually on the Modem page to determine the best DMR demodulation mode for your transceiver. See DMR AutoCal’s usage in the Connectors section below.
Example channel configurations:
D-STAR radio setup
- Set the radio to single frequency mode.
- If you want to use a reflector, set the URCALL on your radio to CQCQCQ. If you want to use a gateway, set the URCALL to the gateway’s callsign and remote module. Remote module should be the last character of the URCALL. Make sure you have registered your local module on the D-STAR gateway registration system. If you have a registration, you have probably registered the “space” local module, in this case set your openSPOT’s local module to a space (empty) character. You can check your D-STAR registration here.
- You don’t have to care about RPT1 and RPT2 settings.
C4FM radio setup
- Set the radio to single frequency mode.
- Use digital narrow (DN) mode. Wide voice mode does not support late entry.
- If your radio has half deviation mode turned on, make sure you ran C4FM Half Deviation AutoCal or change C4FM Half Deviation demod modes manually on the Modem page to determine the best C4FM Half Deviation demodulation mode for your transceiver. See C4FM Half Deviation AutoCal’s usage in the Connectors section below.
Firmware upgrade
Be sure to always use the latest firmware on your openSPOT. For firmware upgrade files, see this page. Make sure that you use the correct firmware file for your openSPOT’s hardware version. The hardware version is printed on the bottom of the device, it’s in the model ID. For example, if you see SRF-OSP-1.1 there, you have hardware version 1.1.
openSPOT uses a custom bootloader which shows up as a flash drive with our official USB ID (0x1fc9:0x8124).
Here’s a tutorial video about upgrading the firmware:
Entering bootloader mode
To start firmware upgrading, you’ll have to connect openSPOT to a computer using the USB cable, and you have to enter openSPOT into bootloader mode:
– The simplest way is to open the web interface, log in, go to the Settings page, and click on the Reboot to bootloader button.
– The other way is:
– Disconnect openSPOT’s USB cable, so it will be powered off.
– Press its reset button with a ballpoint pen (please DON’T use a sharp item like a needle), and keep it pressed.
– Plug openSPOT’s USB cable in while keeping the reset button pressed. The ACT and STATUS red LEDs will be on while you keep pressing the reset button.
– Release the reset button, if the ACT LED is off, and STATUS and MODEM green LEDs are blinking periodically, then openSPOT has successfully entered bootloader mode.
– You can also switch openSPOT to bootloader mode using the serial console. Enter the command rbb. See the serial console section below for more information.
In bootloader mode, openSPOT will show up as a flash drive labelled BOOTLOADER on your computer. There will be two 0 byte text files on this flash drive:
– SRF-OSP.RDY
– SRF-OSM.RDY
These two files signal that both the main and the modem CPUs are ready to start the firmware upgrade process.
Starting firmware upgrade
- Copy the firmware .bin file to the flash drive amongst the currently present text files.
- The STATUS LED will toggle between red and green states periodically. Firmware upgrade will last about 2 minutes. Do not power off, reboot or reset openSPOT or your computer until the upgrade process is finished!
- If the STATUS LED is constantly green for at least 5 seconds, the process is finished successfully, if it’s constantly red for at least 5 seconds, the process is finished with errors. When the process is finished, openSPOT will reconnect its flash drive.
- You can check the result of the firmware upgrade by looking at the flash drive. If you see SUCCESS.TXT, the process completed without errors. If there are no SUCCESS.TXT is present, please re-download the firmware file (it may have gotten corrupted during the download), and retry the whole firmware upgrade process. If it fails after several times, take a note of what other files are present on the drive and write us a post in the openSPOT troubleshooting forum.
- Finally, you can reboot openSPOT, or just wait a minute, as the bootloader automatically reboots after 1 minute of inactivity.
- openSPOT will start in normal mode and upgrades the modem CPU automatically. This process lasts about 10 seconds, you can see the modem LED toggling between red and green states periodically.
- Now both the main and the modem CPU’s firmware are upgraded. You can continue using openSPOT. See the new firmware’s changelog for new features!
If you reboot openSPOT and the ACT and STATUS LEDs are blinking red by turns, you’ve uploaded a firmware file with an incorrect hardware version. Retry firmware upgrade with the correct firmware upgrade file.
Your browser may cache the previous version’s web interface. Close and reopen your browser after a firmware upgrade, and press CTRL+R several times to clear the browser’s cache.
If you are using a Mac and you have issues with the firmware upgrade, you may try copying the firmware .bin file using cp in the Terminal instead using Finder. Open a Terminal, then enter cp ~/Downloads/srf-osp-1.1-0113.bin /Volumes/BOOTLOADER/ (replace ~/Downloads/srf-osp-1.1-0113.bin with the path to the firmware .bin file).
Networking info
openSPOT’s factory setting is to acquire an IP address using DHCP from the user’s local router/DHCP server.
You can open the web interface by entering openSPOT’s host name in your browser (you have to enter http:// before the hostname, otherwise your browser will start a web search instead of opening the web interface). The factory default host name is openspot, that’s why you have to open http://openspot/ when opening the web interface for the first time. If it doesn’t work, try opening http://openspot.local.
If neither of the above works (this may be the case if you want to open the web interface on Android and iOS phones, which don’t support MDNS or LLMNR), you can try opening the web interface with openSPOT’s IP address. Here are some tips on how to find openSPOT’s IP address:
– You can look at the DHCP clients list in your router’s web interface.
– If voice announcements are enabled in the openSPOT, you can query the active IP address:
– DMR: start a call to the IP address query DMR ID (by default it’s 9001). In DMR mode, voice announcements are sent to TG9, so to hear them, make sure you have TG9 in your radio’s RX group list.
– D-STAR: start a call to the repeater info callsign …….A (7 spaces and an I, replace dots with spaces)
– C4FM: enter the Special command DTMF code (by default it’s *) followed by DTMF code B
– On Android and iOS phones, you can use MDNS/Bonjour discovery applications to find openSPOT’s IP address. Recommended apps for Android are Zentri Discovery or ZeroConf Browser.
The default login password for the web interface is openspot (all letters are lower case).
You don’t have to set any port forwards in your router for openSPOT. All the protocols used are designed in a way that initiate the connection, so your router will keep the used port open in both directions.
Resetting configuration
If you changed settings in a way that you can’t reach the web interface, you can restore factory default configuration by following the steps below. The procedure is the same as starting the bootloader, except that you have to press the reset button for longer time.
Here’s a tutorial video on resetting the configuration:
Required steps:
- Power off the device.
- Keep the reset button pressed, and plug back the USB cable.
- Keep the reset button pressed for at least 10 seconds.
- After 10 seconds the STATUS and MODEM LEDs will flash quickly 5 times, signaling that the default configuration has been restored.
- Release the reset button. The bootloader starts.
- Press the reset button once for a short time to exit the bootloader.
- That’s all, openSPOT starts with factory default settings (DHCP client mode).
Web interface
When the web interface is loading data from openSPOT, a loader animation is displayed in the top right corner of the page.
Static information on all pages of the web interface
- openSPOT’s hostname is in the upper right corner of the page. This is not visible on small displays.
- openSPOT’s current IP address is in the lower left corner of the page. This is not visible on small displays.
- Advanced mode checkbox is in the lower right corner of the page. If this gets checked, all advanced mode settings show up. If you uncheck it, advanced mode settings will be hidden. Advanced mode is not needed for normal operation.
Login page
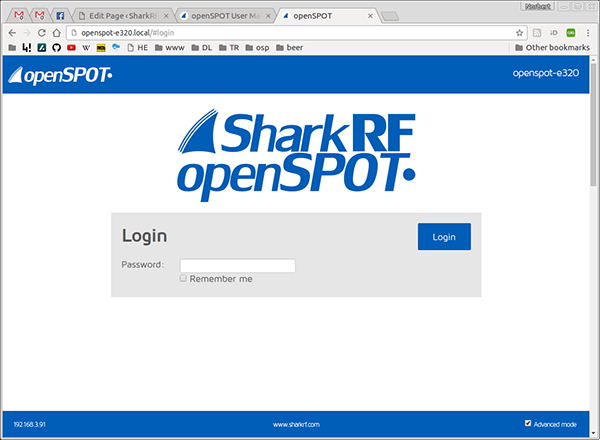
This is the page where you can log in to the web interface. Enter openSPOT’s password, then click on the Login button. If you check the Remember me checkbox, openSPOT will not ask for a login until it gets rebooted, or your browser forgets the login cookie.
Status page
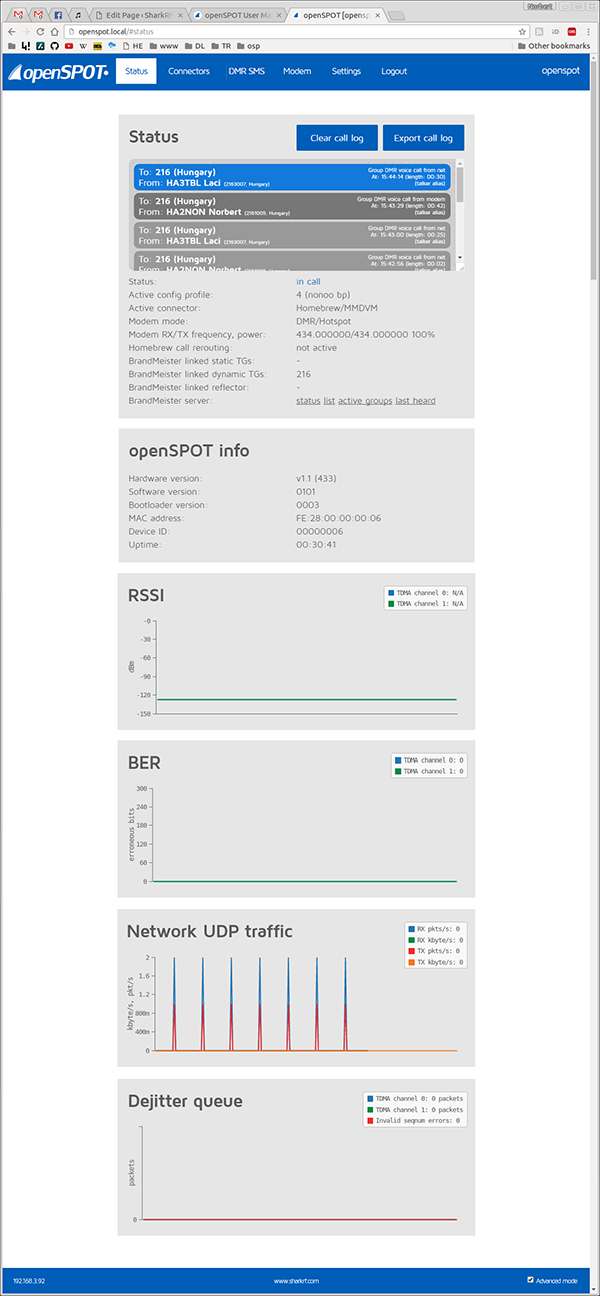
You can see the current status of openSPOT on this page. All dynamic information are refreshed every 500ms.
- The RSSI graph shows receive signal strength for received packets from the modem. It is not updated when openSPOT modem is not synced to a station.
- The BER graph shows received Bit Error Ratio. BER is calculated also for packets received from connectors, not just from the modem.
- The Network UDP traffic graph shows transmit and receive UDP traffic for the currently active connector. Note that UDP+IP+Ethernet header overhead is not included in displayed values.
- Dejitter queue graph (only shown in advanced mode) shows the number of packets waiting in the dejitter queue. All packets received from a connector will first go to this queue to eliminate network jitter. If the dejitter queue length is too short, the graph’s line can touch zero during a QSO and the call’s audio can stop for a moment. If the length is too long, the delay can be unnecessarily high. You can use this graph to set a proper dejitter queue length. There should be at least 4-5 packets in the dejitter queue when receiving a call from a connector. You can set the dejitter queue length on the Settings page. As a general rule, if you have a good network connection to the selected connector, set dejitter queue length to 500ms, and if you have a 3G/4G internet connection or voice stutters a lot, try setting the length to at least 1000ms.
Connectors page
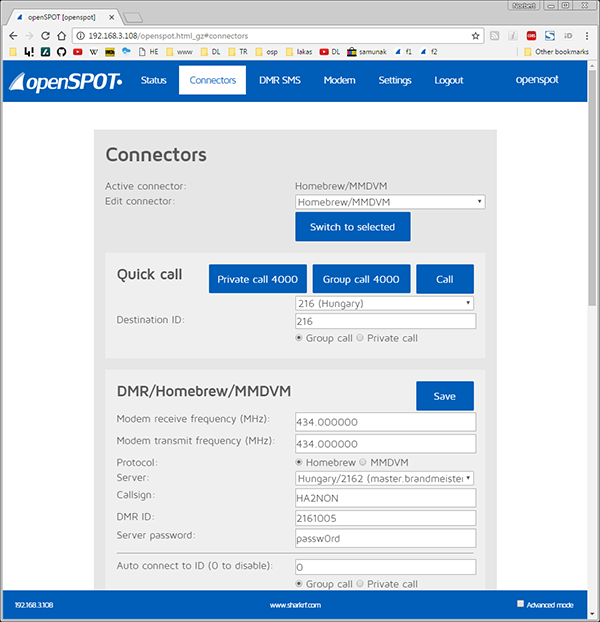
In openSPOT terms, a connector is the protocol which you use to connect your openSPOT to a server.
- openSPOT can connect to one connector at a time. You can edit a connector’s settings by selecting it from the Edit connector list.
- The currently active connector can be changed by selecting a new one from the Edit connector list, and then clicking on the Switch to selected button.
- Don’t forget to click on the Save button after changing a connector’s settings.
- If the connector you switch to doesn’t match the modem’s current mode, the web interface will show a popup dialog, where you can switch the modem to the appropriate mode. For example, if the current mode is DCS, and the current modem mode is – obviously – D-STAR, and you switch to the Homebrew connector, the popup dialog will ask you if you want to switch the modem to DMR mode. If you miss the popup, you can do this manually on the Modem page of course.
- Some connectors have “Add server” and “Remove” buttons. These buttons can be used to add and remove custom servers to the server list. Note that custom servers are stored in your browser’s local storage, so if you switch browser or computer, you won’t see your saved custom servers.
- openSPOT’s local echo service is available in all connectors:
- DMR: start a call to the local echo DMR ID (by default it’s 9999, this can be changed on the Settings page), and openSPOT will play back the recorded voice. Calls started on the local echo DMR ID won’t get sent to the network.
- D-STAR: start a call to the local echo callsign (by default it’s …….E (7 spaces and an E, replace dots with spaces), this can be changed on the Settings page), and openSPOT will play back the recorded voice. Calls started on the local echo callsign won’t get sent to the network.
- If voice announcements are enabled, you can query the active connector’s status.
- DMR: start a call to the Connector query DMR ID (by default it’s 9998). In DMR mode, voice announcements are sent to TG9, so to hear them, make sure you have TG9 in your radio’s RX group list.
- D-STAR: start a call to the repeater info callsign …….I (7 spaces and an I, replace dots with spaces)
- C4FM: enter the Special command DTMF code (by default it’s *) followed by DTMF code D
If advanced mode is turned on, you’ll be able to change the following settings:
- You can activate a modem RX timeout to change the active connector to the Null connector after the last call received by the modem (minimum timeout value is 5 minutes). For example, if you set a timeout of 10 minutes, openSPOT will change to the Null connector if there is no call received from your radio for 10 minutes.
DMR connectors
Homebrew/MMDVM connector
You can use this connector to connect openSPOT to a DMR network which supports the Homebrew or the MMDVM protocol, like BrandMeister.
Modem modes supported in this connector: DMR, C4FM
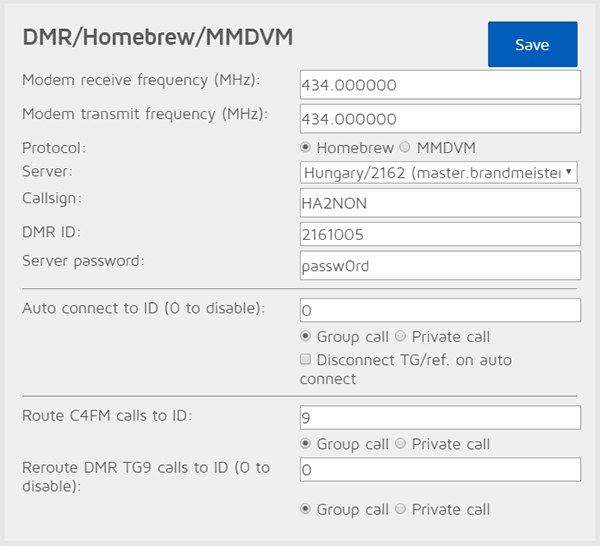
To use the Homebrew connector, follow these steps:
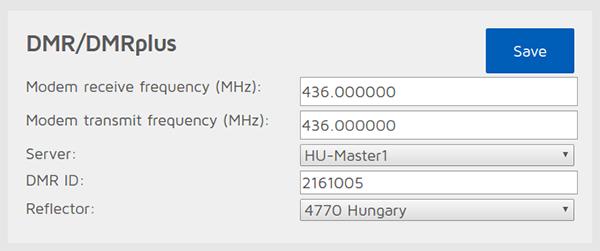
1. Select the protocol mode. Use Homebrew mode for BrandMeister servers, and MMDVM mode for DMRplus servers (Phoenix and DMR-MARC included).
3. Select a server from the list, preferably the nearest to your current location.
4. Enter your callsign.
5. Enter your DMR ID.
6. Enter the server password. The default password for Brandmeister servers is passw0rd or password (note that some servers does not use the default password – you have to ask your server’s admin for the password if openSPOT won’t connect with the default one)
7. Enter the reflector or talkgroup ID you want to connect to in the Auto connect to ID field. (optional, using auto connect is not needed on BrandMeister, see notes below). If you use auto connect, set the Auto connect to ID call type. If you want auto connect to a reflector, set it to Private call, if you want to auto connect to a talkgroup, set it to Group call.
9. Click on the Save button, then click on the Switch to selected button to make this the active connector.
10. Start a short private call to the reflector DMR ID you want to connect to, or a short group call to the group DMR ID you want to talk to.
If advanced mode is turned on, the following settings become available:
– You can manually enter a host name or IP address for the server.
– You can set the UDP port of the connector. The default port for Homebrew is 62030.
– You can set a backup server which openSPOT will use if the primary server is not reachable for Backup server activate connect seconds. If openSPOT is connected to the backup server, it will stay connected to it until the connection drops, and then it will retry with the primary server.
– You can set your website’s URL which is sent to the server.
– You can set the TDMA channel (0 or 1) where auto connect will try to link the given ID.
– You can set the auto connect interval in seconds. By settings this, you can stay connected to the given auto connect TG/reflector at all times. Setting this interval other than zero is not recommended, see the notes below.
– You can set the TDMA channel for data in DMO mode. DMO mode is enabled if the modem’s RX and TX frequencies match, or the modem is in DMR Hotspot mode. In this case, only one TDMA channel will be used for communication. Note that on BrandMeister, DMO mode links the two timeslots together, so this setting is irrelevant.
– You can set the keepalive interval and RX timeout in seconds. The default keepalive interval for Homebrew is 5 seconds, and RX timeout is 30 seconds.
Using a C4FM radio
- If you want to use a C4FM radio with the Homebrew/MMDVM connector, then set the Route C4FM calls to ID to the talkgroup ID you want to talk to (set the call type to Group call).
- If you want to talk on a reflector using your C4FM radio, set the Route C4FM calls to ID to the reflector ID with call type Private call, start a short PTT call, so the reflector gets linked, and then set Route C4FM calls to ID to DMR ID 9 with call type Group call. Then you can start talking.
- You can make a quick group call by dialing DTMF # followed by the destination DMR ID. To start a private call, dial DTMF * followed by the destination DMR ID. These quick calls modify the default DMR ID and call type for cross-mode C4FM calls dynamically. If you want, you can change the group call # and private call * DTMF codes to different ones on the Settings page, C4FM settings section.
Call rerouting
You can enable rerouting by setting a reroute ID other than zero. If rerouting is active, all calls are rerouted to and from TG9. This makes using talkgroups easier for users used to simpler networks like DMRplus.
For example, if you set the reroute ID to 3100/group call, then if you call TG9 on your radio, your call will be sent to TG3100, and if someone talks on TG3100, the call will be sent to TG9 on your radio, so it will receive it even if you don’t have TG3100 in your RX group list. Another example: if you set the reroute ID to 9990/private call, then if you call TG9, your call will go to the parrot service 9990, and the parrot reply will come back to you to TG9.
Rerouting is dynamic, if you start a short call to a new reflector/talkgroup, reroute ID will be automatically set to the new reflector/talkgroup.
SSIDs
You can optionally use SSIDs to connect multiple hotspots to the Brandmeister network. For example, if your DMR ID is 2161005, and you want to connect with SSID 43, append the number to your DMR ID in the Homebrew connector settings DMR ID field like this: 216100543. Brandmeister will automatically link you as 2161005 with SSID 43. This way you don’t need multiple DMR IDs for multiple hotspots.
Auto connect
Using the auto connect feature is not required on BrandMeister. The new BM version stores which TG/reflector you were last on, and when you reconnect to the server with your hotspot, it automatically links you to the last used TG/reflector.
If auto connect is enabled, and you switch talkgroup/reflector from your radio, the auto connect ID will be set to the new talkgroup/reflector.
If you are using auto connect to a talkgroup, it is advisable to check “Disconnect TG/ref. on auto connect”. If it’s enabled, openSPOT will automatically disconnect the currently active TG/reflector after connecting to the server. This is useful if you only want to use a talkgroup, but the server always links you to a reflector automatically.
Note that the Homebrew protocol does not support auto reflector connecting. openSPOT uses a workaround, it starts a short, empty call to the given reflector/talkgroup ID, so the server will connect the desired reflector/talkgroup. These periodic empty calls will show up on the BrandMeister dashboard. If this bothers you, set auto connect interval to 0, or disable auto connect.
BrandMeister manager
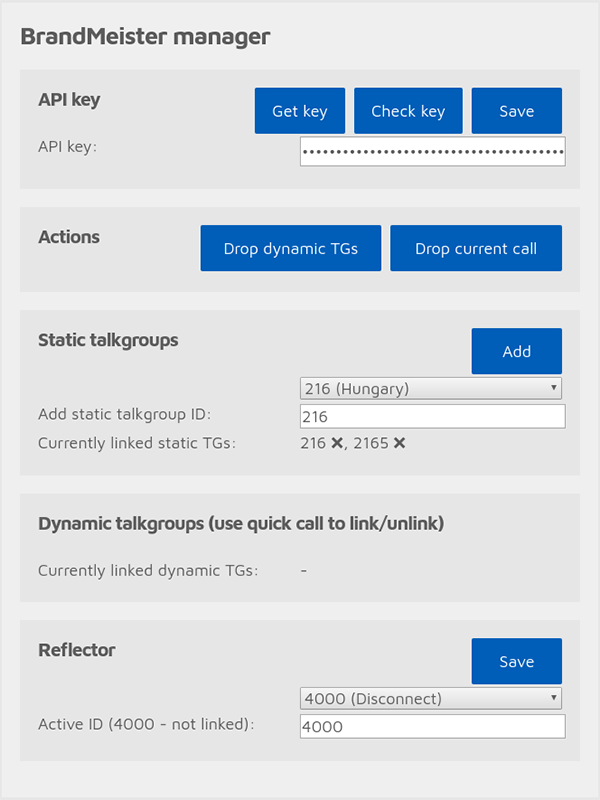
If you are using a BrandMeister server, the BrandMeister manager appears above the Homebrew/MMDVM connector settings. To use it, first you need to obtain an API key from your BrandMeister profile by clicking on the Get key button. After you’ve copied the API key to the clipboard, paste it into the API key input text box and click on the Save button. The key’s validity will be automatically checked, but you can also initiate a key validity check by clicking on the Check key button. If the key is valid, you can perform some actions and add/remove static talkgroups and set/reset the currently active reflector. Keep in mind, that you can also drop dynamic talkgroups, link/unlink a reflector by using the Quick call section on the Connectors page.
Other notes
If you are using a BrandMeister server, you can see the list of currently linked static, dynamic talkgroups and reflectors on openSPOT’s Status page.
If you can’t connect to a server, please make sure you are using the correct password and UDP port number. If you don’t know them, ask the server’s administrator.
DMRplus connector
You can use this connector to connect openSPOT to the DMRplus network using the dongle protocol. This protocol only lets you use reflectors on DMRplus servers, so use the Homebrew/MMDVM connector in MMDVM protocol mode if you want to use talkgroups.
Modem modes supported in this connector: DMR, C4FM
To use the DMRplus connector, follow these steps:
1. Select a server from the list, preferably the nearest to your current location.
2. Enter your DMR ID.
3. Select a DMRplus reflector from the list.
4. Click on the Save button, then click on the Switch to selected button to make this the active connector.
If advanced mode is turned on, the following settings become available:
– You can manually enter a host name or IP address for the server.
– You can set the UDP port of the connector. The default port for DMRplus is 8880.
– You can manually enter a reflector ID.
– You can set the keepalive interval and RX timeout in seconds. The default keepalive interval for DMRplus is 1 second, and RX timeout is 10 seconds.
You can change the current reflector without the web interface by starting a short call with your radio to a DMR ID between 4000 and 5000.
If you are using a C4FM radio, you can change the current reflector without the web interface by sending a DTMF code in the format *4004 for connecting to reflector 4004. If you want, you can change the private call * DTMF code to different one on the Settings page, C4FM settings section.
TS repeat connector
You can use this connector to repeat calls received from one timeslot to the other one. This is only useful when the modem is in the experimental DMR/BS mode. This connector has no settings.
Modem modes supported in this connector: DMR
D-STAR connectors
DCS/XLX connector
You can use this connector to connect openSPOT to a network which supports the DCS protocol.
Modem modes supported in this connector: D-STAR
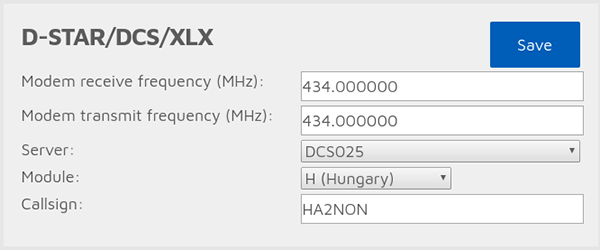
To use the DCS connector, follow these steps:
1. Select a server and remote module from the list, preferably the nearest to your current location.
2. Enter your callsign.
3. Click on the Save button, then click on the Switch to selected button to make this the active connector.
If advanced mode is turned on, the following settings become available:
– You can manually enter a host name or IP address for the server.
– You can set the UDP port of the connector. The default port for DCS is 30051.
– You can set the CCS UDP port of the connector. The default port for CCS is 30062.
– You can manually set the local module (D by default).
– You can manually set the reflector ID.
– You can manually set the remote module.
– You can set the RX timeout in seconds. The default RX timeout is 30 seconds.
Try remote module Z on any reflector for the DCS echo service (may not enabled/supported on some servers).
You can switch reflectors with your radio by starting a short call to their names as the destination callsign (urcall), like DCS001 A, or XLX001 A. You’ll find the active server at the server host input box when you turn on the advanced settings. You can also switch to REF/XRF servers by this method – switching this way changes openSPOT’s active connector.
As openSPOT is designed to be always connected, the unlink (U) command is not interpreted. If you really want to disconnect, you can switch to a config profile which has the Null connector activated.
REF/XRF (DPlus/DExtra) connector
You can use this connector to connect openSPOT to a network (reflector), or a D-STAR gateway (repeater) which supports the REF (DPlus) protocol.
Modem modes supported in this connector: D-STAR
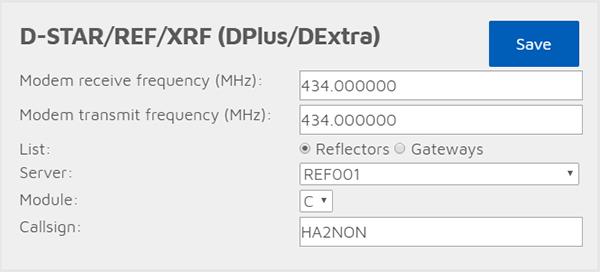
To use the REF/XRF connector, follow these steps:
1. Select a server and remote module from the list, preferably the nearest to your current location.
2. Enter your callsign.
3. Click on the Save button, then click on the Switch to selected button to make this the active connector.
If you want to use a reflector, set the URCALL on your radio to CQCQCQ. If you want to use a gateway, set the URCALL to the gateway’s callsign and remote module. Remote module should be the last character of the URCALL. Make sure you have registered your local module on the D-STAR gateway registration system. If you have a registration, you have probably registered the “space” local module, in this case set your openSPOT’s local module to a space (empty) character. You can check your D-STAR registration here.
If advanced mode is turned on, the following settings become available:
– You can manually enter a host name or IP address for the server/repeater.
– You can set the UDP port of the connector. The default port for REF is 20001.
– You can set the CCS UDP port of the connector. The default port for CCS is 30062.
– You can manually set the local module (D by default).
– You can manually set the reflector ID.
– You can manually set the remote module.
– You can set the RX timeout in seconds. The default RX timeout is 30 seconds.
Note that if you are connecting to a repeater, you have to set the reflector ID to the callsign of the repeater.
Try remote module E on any reflector for the REF/XRF echo service (may not enabled on some servers).
You can switch reflectors/gateways with your radio by starting a short call to their names as the destination callsign (urcall), like REF001 A, or XRF001 A, or XLX001 A. You’ll find the active server at the server host input box when you turn on the advanced settings. You can also switch to DCS servers by this method – switching this way changes openSPOT’s active connector.
As openSPOT is designed to be always connected, the unlink (U) command is not interpreted. If you really want to disconnect, you can switch to a config profile which has the Null connector activated.
System Fusion connectors
FCS connector
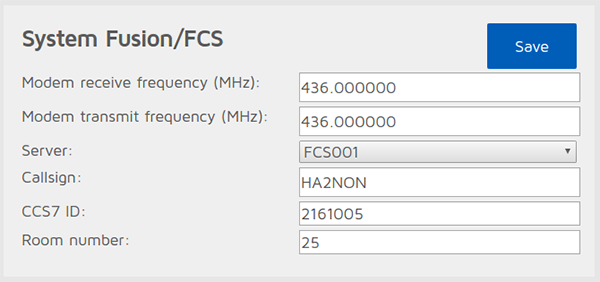
You can use this connector to connect openSPOT to a network which supports the FCS protocol.
Modem modes supported in this connector: C4FM, DMR
To use the FCS connector, follow these steps:
1. Select a server and remote module from the list, preferably the nearest to your current location.
2. Enter your callsign.
3. Enter your CCS7/DMR ID.
4. Click on the Save button, then click on the Switch to selected button to make this the active connector.
If advanced mode is turned on, the following settings become available:
– You can manually enter a host name or IP address for the server.
– You can set the UDP port of the connector. The default port for FCS is 62500.
– You can manually enter the reflector name and room number.
– You can set the keepalive interval and RX timeout in seconds. The default keepalive interval for FCS is 1 second, and RX timeout is 30 seconds.
You can change rooms with your C4FM radio by entering the Special command DTMF code (by default it’s *) followed by the desired room number (for example *99 for room 99). If you are using a DMR radio, then you can change rooms by starting a private call to the desired room number. You can switch FCS servers if you use 3 digits. Example: entering *303 will switch to FCS003 room 03.
YSFReflector connector
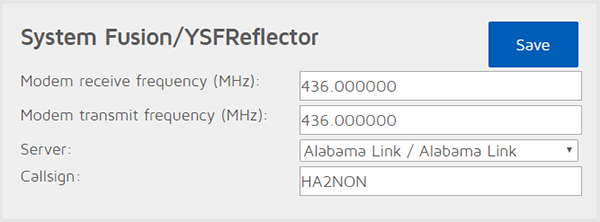
You can use this connector to connect openSPOT to a network which supports the YSFReflector protocol.
Modem modes supported in this connector: C4FM, DMR
To use the YSFReflector connector, follow these steps:
1. Select a server from the list.
2. Enter your callsign.
3. Click on the Save button, then click on the Switch to selected button to make this the active connector.
If advanced mode is turned on, the following settings become available:
– You can manually enter a host name or IP address for the server.
– You can set the UDP port of the connector. The default port for YSFReflector is 42000.
– You can set the keepalive interval and RX timeout in seconds. The default keepalive interval for YSFReflector is 5 seconds, and RX timeout is 30 seconds.
You can switch YSFreflector servers with your radio by setting up different servers in separate openSPOT configuration profiles, and switch between them. Please see the Config profile settings section above on how to switch between the config profiles.
SharkRF connectors
SharkRF IP Connector Server
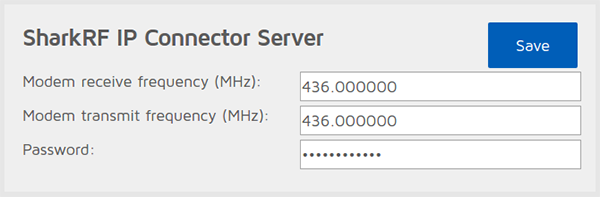
This is the UDP API server connector you can use to develop your own applications which use openSPOT. You can also use this connector to directly link two openSPOTs together without any servers. The protocol’s documentation can be found on GitHub.
Modem modes supported in this connector: DMR, D-STAR, C4FM, raw (with automatic cross mode conversion between DMR and C4FM DN mode)
openSPOT accepts all connecting client IDs if the password is correct.
To start a SharkRF IP Connector Server, follow these steps:
1. Enter the server’s password.
2. Click on the Save button, then click on the Switch to selected button to make this the active connector.
If advanced mode is turned on, the following settings become available:
– You can set the UDP port of the server. The default port is 65100.
– You can set the RX timeout in seconds. The default RX timeout is 30 seconds.
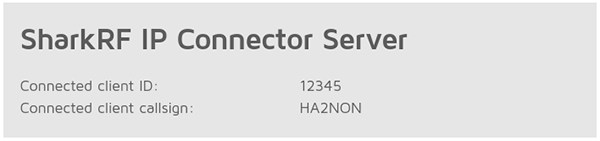
If SharkRF IP Connector Server is the active connector, the following status box shows up on the status page below the Status box:
Note that you’ll need to forward the UDP port of the server (65100 by default) on your router from the Internet to openSPOT’s LAN IP address if you want a client from the Internet to be able to connect to it.
SharkRF IP Connector Client
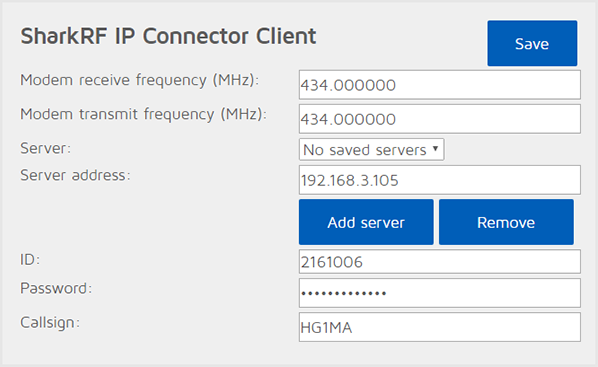
This is the UDP API client connector protocol you can use to develop your own applications which use openSPOT. You can also use this connector to connect openSPOT to the SharkRF IP Connector Protocol Server, or a network which supports the SharkRF IP Connector protocol. The protocol’s documentation can be found on GitHub. You can also directly link two openSPOTs together without any servers (one of the openSPOT needs to be a client, and the other needs to be a server).
Modem modes supported in this connector: DMR, D-STAR, C4FM, raw (with automatic cross mode conversion between DMR and C4FM DN mode)
To start a SharkRF IP Connector Client, follow these steps:
1. Enter the server’s address.
2. Enter an ID, like your DMR/CCS7 ID.
3. Enter the server password.
4. Optionally enter your callsign.
5. Click on the Save button, then click on the Switch to selected button to make this the active connector.
If advanced mode is turned on, the following settings become available:
– You can set the UDP port of the server. The default port is 65100.
– You can set the keepalive interval and RX timeout in seconds. The default keepalive interval is 5 seconds, and RX timeout is 30 seconds.
Special connectors
Null connector
The Null connector – as it’s name says – does not connect to anywhere. You can use this connector if you don’t want your openSPOT to connect to any server, because you want to test something.
Modem modes supported in this connector: DMR, D-STAR, C4FM
DMR AutoCal
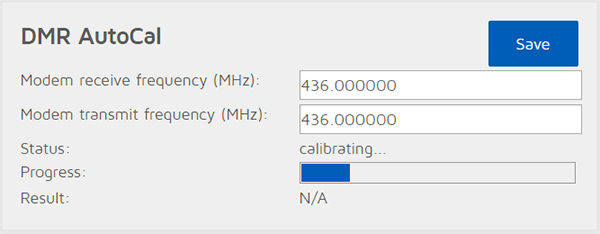
If you have high BER and bad uplink audio quality, you can use this special connector to find out which DMR demodulation mode gives the lowest BER and best audio quality with your specific radio. After activating this connector, press and hold PTT until a result is available. The progress bar will go up to 100% after about 1-2 minutes of continuous transmitting with your radio. After a DMR demodulation mode result is available, it is automatically set, and you can release the PTT.
DMR echo test works as normal, but note that RSSI and BER graph data is unavailable when this connector is active.
If AutoCal won’t start for you when you press the PTT, you have to manually try each DMR demodulation mode: activate the Null connector, and try the local echo test (by default it’s on DMR ID 9999) in each DMR demodulation mode to see which demod mode gives you the lowest BER (you can check the BER graph on the Status page, and also hear your own voice quality by using the local echo test).
C4FM Half Deviation AutoCal
If your radio has half deviation mode turned on, and you have high BER and bad uplink audio quality, you can use this special connector to find out which C4FM half deviation demodulation mode gives the lowest BER and best audio quality with your specific radio. After activating this connector, press and hold PTT until a result is available. The progress bar will go up to 100% after about 1 minute of continuous transmitting with your radio. After a C4FM Half Deviation demodulation mode result is available, it is automatically set, and you can release the PTT.
Note that RSSI and BER graph data is unavailable when this connector is active.
If AutoCal won’t start for you when you press the PTT, you have to manually try each C4FM Half Deviation demodulation mode: activate the FCS connector with room 99 (echo), and try the echo test in each C4FM Half Deviation demodulation mode to see which demod mode gives you the lowest BER (you can check the BER graph on the Status page, and also hear your own voice quality by using the echo test).
DMR SMS page
When the modem is in DMR mode, or the currently active connector supports DMR SMS sending, the DMR SMS page shows up on the menu bar.
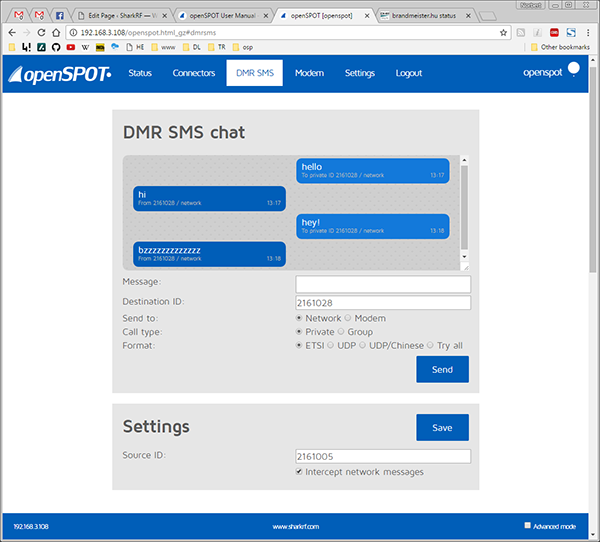
- Sent messages are displayed on the right, received messages are displayed on the left of the chat box. You can click on each message for additional information.
- The message length is currently limited to 75 characters.
- Note that the modem radio button is disabled if the modem is not in DMR mode.
- Messages sent to openSPOT’s DMR echo ID (it’s 9999 by default) will be echoed back to the sender.
- Note that openSPOT only stores the last received message, so you have to keep open this page in your browser to receive more than one message at once.
- You can simply use the ETSI format if you want to send messages through the network.
- Use ETSI format if you want to send a message to Hytera radios, and UDP format for Motorola radios. TDMA channel can be selected if the modem is in DMR-BS or DMR-MS modes.
- If you want to receive messages from the network on the DMR SMS page, you have to enable Intercept network messages. If it’s enabled, received SMS messages to the given Source ID won’t be forwarded to your radio.
- Note that the underlying network must know about the location of your Source ID. If you want to receive DMR SMS messages from the network, you have to set the Source ID to the DMR ID you set on the connector page, or if you want to use another ID, then you have to start a short call from that DMR ID with your radio, so the network will know that your custom DMR ID can be reached through your openSPOT.
Here’s a video about using the DMR SMS page:
Modem page
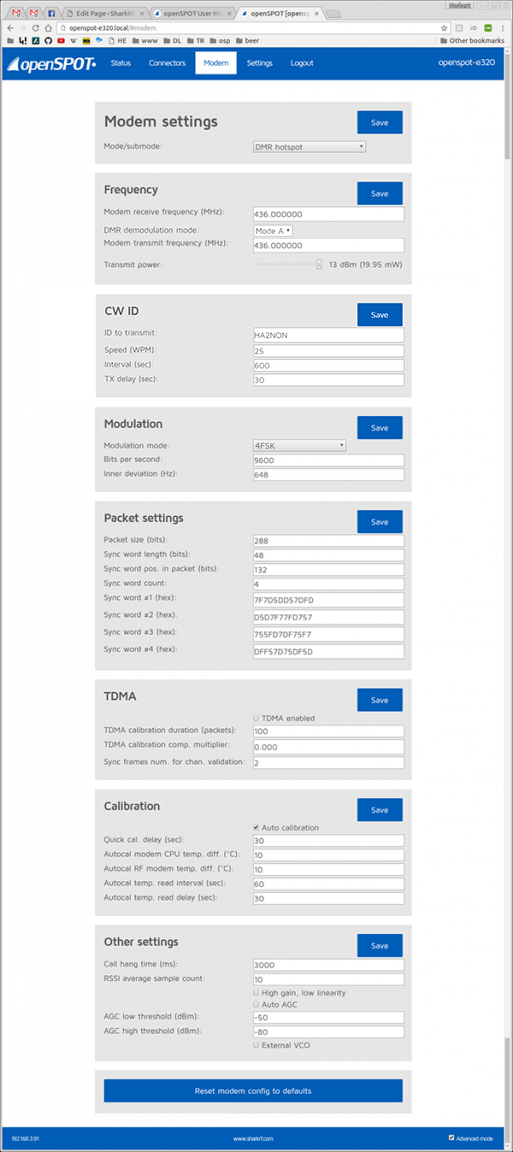
On this page, you can change the settings of the modem. All gray blocks have a separate Save button, so if you change a setting in a block, make sure you click on it’s Save button.
If you changed settings in a way the modem won’t work for you anymore, you can always reset it’s settings to defaults using the Reset modem config to defaults button at the bottom of the modem setings page.
Modem mode
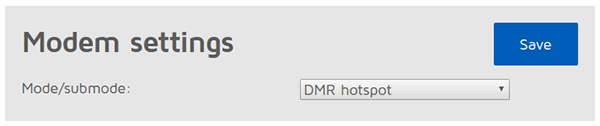
Here you can change the modem’s active mode.
- Idle mode: In this mode, the modem won’t transmit and ignore received data.
- DMR/Hotspot mode. Use this if you want to use a DMR connector. Calls will be sent on both timeslots simultaneously, so you don’t have to worry about timeslot setting in your radio.
- D-STAR mode: Use this if you want to use a D-STAR connector.
- C4FM mode: Use this if you want to use a System Fusion connector.
Advanced mode modem settings
Raw mode
In this mode, the received and sent data will be unprocessed.
DMR/BS mode
Experimental DMR base station mode. In this mode, both timeslots work separately.
DMR transceivers handle BS and simplex operation by looking at the RX and TX frequencies of the current channel. If both RX and TX frequencies are the same, the transceiver will operate in simplex mode, if they are different, in BS mode. If you press PTT and your transceiver is in BS mode, it will first try to wake up the base station by transmitting BS Outbound Activation CSBK frames. The BS then should start to send idle DMR frames on it’s downlink, which the transceiver will detect and then starts the call. If downlink frames are not detected during the wake up phase, the transceiver will respond with a Repeater wake up failed message. If the transceiver is in simplex mode, no wake up process is performed.
For the DMR/BS mode to work correctly, you have to set separate RX and TX frequencies both for openSPOT and your transceiver. As openSPOT only has one modem it is not capable of full duplex operation, it can only receive or only transmit at a time. Therefore, the difference between RX and TX frequencies doesn’t matter. When openSPOT receives a BS Outbound Activation CSBK frame, it will send a few idle frames on both timeslots, so the transceiver will know the TDMA sync. However, DMR transceivers are not designed for waking up half-duplex base stations, so the wake up procedure is not as reliable with openSPOT as with an industrial full-duplex repeater.
DMR/MS mode
Experimental DMR mobile station mode. In this mode, both timeslots work separately. Note: BS Outbound Activation CSBK frames are not sent by openSPOT automatically.
Frequency
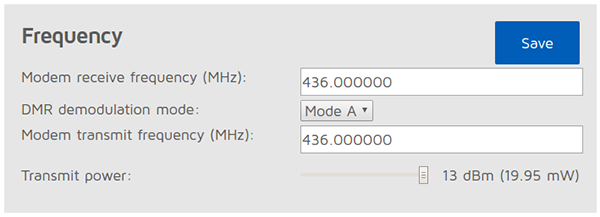
Here you can set openSPOT’s RX and TX frequencies and it’s transmit power. Note that changing the frequency here also overwrites the active connector’s frequency settings.
- DMR demodulation mode: this is available in DMR modes only. If you have high BER and bad uplink audio quality, you can try to switch to a different DMR demodulation mode, however, finding out which mode gives you the lowest BER and best audio quality is much easier with using the DMR AutoCal special connector. The easiest way to listen to your audio is to use openSPOT’s build in DMR local echo (it’s on DMR ID 9999 by default). The default demodulation mode is A.
- C4FM Half Deviation demodulation mode: this is available in C4FM Half Deviation mode only. If you have high BER and bad uplink audio quality, you can try to switch to a different C4FM Half Deviation demodulation mode, however, finding out which mode gives you the lowest BER and best audio quality is much easier with using the C4FM Half Deviation AutoCal special connector. The easiest way to listen to your audio is to use FCS room 99’s echo. The default demodulation mode is A.
CW ID
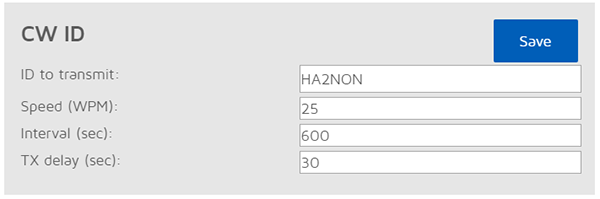
You can set a CW ID which openSPOT will transmit at the specified interval with the specified speed. You can use letters, numbers, slash (/) and space characters. Note that openSPOT transmits an unmodulated carrier wave, so you’ll only be able to hear it with a radio which is capable of CW/SSB demodulation. Before openSPOT starts to transmit the CW ID, it waits at least TX delay seconds after the last active call, if the last call was earlier than the TX delay setting. An incoming call (both from a radio or from the network) will interrupt the CW ID transmission, so enabling CW ID does not interfere with openSPOT’s normal operation.
Modulation
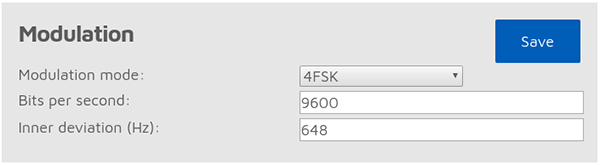
This block is only available in advanced mode. It’s not available in D-STAR modem mode.
You can set modem modulation parameters here.
- Modulation mode: modem modulation mode. Set it to 4FSK Raised Cosine (RC) for DMR.
- Bits per second: bitrate (not symbol rate).
- Inner deviation (Hz): the inner deviation in Hz. For 2FSK modes, this is the deviation. For 4FSK modes, outer deviation is calculated as inner deviation * 3.
Packet settings
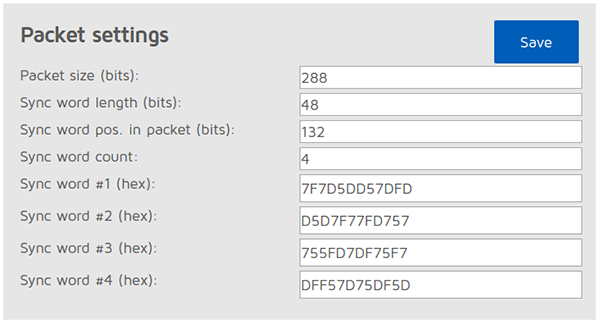
This block is only available in advanced mode. It’s not available in D-STAR modem mode.
You can set modem packet settings here.
- Packet size (bits): size of a packet in the current mode.
- Sync word length (bits): size of a sync word.
- Sync word pos. in packet (bits): sync word position.
- Sync word count: how many sync words are used.
- Sync word #n (hex): sync words given in hex character pair format. If any of these match, it will be considered as a packet sync.
TDMA
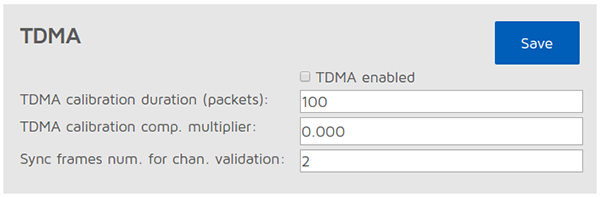
This block is only available in advanced mode. It’s not available in D-STAR modem mode.
You can set TDMA parameters here.
- TDMA calibration duration (packets): for precise TDMA operation, timer calibration is needed. The calibration duration can be set here. For example, DMR packets are 30ms long, so 100 packets will give a 3 second calibration duration.
- TDMA calibration comp. multiplier: you can set a (float) multiplier here for the calibration variables. Changing this from 0 is not needed under normal operatng circumstances.
- Sync frames num. for chan. validation: this many frames with sync needed to be received by openSPOT so we can acquire TDMA channel lock.
Calibration

This block is only available in advanced mode.
You can set calibration parameters here.
- Quick cal. delay (sec): openSPOT waits this many seconds after the last call is finished to start a quick calibration.
- Autocal modem CPU temp. diff. (°C): automatic calibration happens when last automatic calibration and current modem CPU temperature differ this much.
- Autocal RF modem temp. diff. (°C): automatic calibration happens when last automatic calibration and current RF modem temperature differ this much.
- Autocal temp. read interval (sec): read temperatures from modem CPU and RF modem at this interval.
- Autocal temp. read delay (sec): wait at least this many seconds after a call has been finished to read the temperature.
Other modem settings
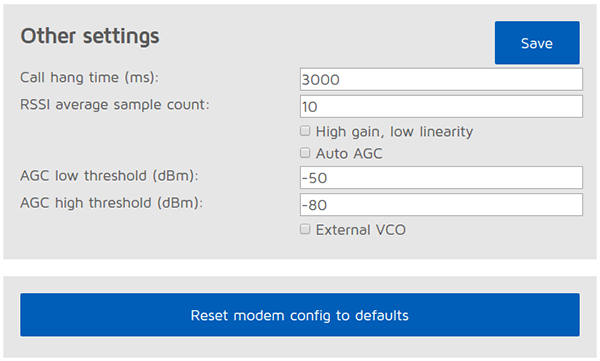
This block is only available in advanced mode.
You can set other modem parameters here. -
Call hang time (ms): openSPOT will wait for this many milliseconds after the last valid packet has been received to consider a call has been finished with a timeout.
- RSSI average sample count: read and average RSSI values from the RF modem this many times.
- Sensitivity level: the modem’s sensitivity level can be changed in 6 levels. Note that increasing sensitivity decreases the linearity of the filters, which may result in incorrectly demodulated bits (which means increased BER). By default, sensitivity is low (level set to 5 or 6).
- Filter gain: changes sensitivity of the filters. Note that increasing sensitivity decreases the linearity of the filters, which may result in incorrectly demodulated bits (which means increased BER). By default, filter gain is 8.
- Auto AGC: openSPOT’s AGC is configured by software for preset values optimal for indoor use and low BER. However, you can turn automatic AGC on, but it is recommended to keep this checkbox off so openSPOT can work on it’s own.
- AGC low/high threshold (dBm): when Auto AGC is on, these values will be considered as low and high thresholds for the Auto AGC circuitry in the RF modem.
- External VCO: an external VCO can be applied to openSPOT which can be enabled here. Note: applying an external VCO is considered as an after-market modification and voids the warranty of openSPOT.
Auto AGC and sensitivity level settings are stored independently for each modem mode (DMR, D-STAR, C4FM).
Settings page
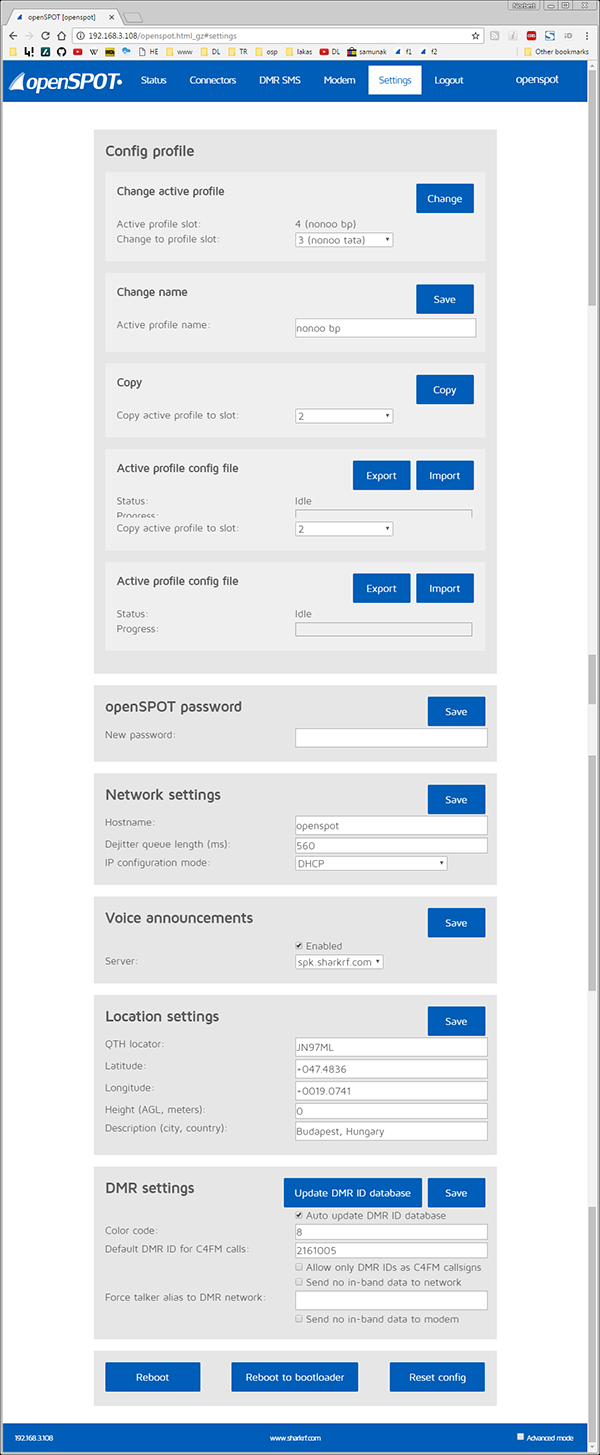
On this page, you can change the general and network settings of openSPOT.
Config profile settings
You can use 5 different config profile slots. You can switch between them on the web interface, or by using your radio:
- DMR: call the Profile query/change base DMR ID (by default it’s 9000) with the new profile number appended to the base ID. Example: you want to switch to profile 4, and your query/change base DMR ID is 9000: you have to call 90004 with a short PTT press.
- C4FM: enter the Special command DTMF code (by default it’s *) followed by the profile query/change DTMF code (by default it’s A) followed by the new profile number. Example: *A4
- D-STAR: call “…….4” (7 spaces and the new profile number, replace dots with spaces)
You can query the active profile number using your radio:
- DMR: call the Profile query/change base DMR ID with a short PTT press (by default it’s 9000).
- C4FM: enter the Special command DTMF code (by default it’s *) followed by the profile query/change DTMF code (by default it’s A). Example: *A
- D-STAR: call “…….P” (7 spaces and an P, replace dots with spaces)
You can rename the active profile, copy it to another slot or export/import to/from a config file.
If you turn on advanced mode, you’ll be able to set a timeout to change profile after the last call received by the modem (minimum timeout value is 5 minutes). For example, if you set a timeout of 10 minutes to profile 0, openSPOT will switch to profile 0 if there is no call received from your radio for 10 minutes.
Notes:
- openSPOT reboots on profile switch.
- The web interface password is stored for each profile separately.
openSPOT password

Here you can set the login password. You can set an empty password too.
Network settings
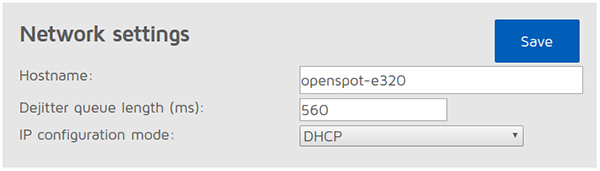
– Hostname: this is the hostname of openSPOT. This can be used to open the web interface by entering http://hostname.local/ or http://hostname/ in the browser. This hostname will be shown in your router’s DHCP Client List.
– Dejitter queue length (ms): this is the length of the dejitter queue in milliseconds. For more info, see the description of the Dejitter queue graph on the Status page.
– IP configuration mode: this can be DHCP, DHCP with fallback to auto IP, auto IP and static. You can use auto IP modes if you want to connect openSPOT directly to a computer without a DHCP server. In that case, both the computer and openSPOT will get an auto IP address, and if internet connection sharing is on for the computer’s Ethernet interface, openSPOT will be able to reach the internet.
If you turn on advanced mode, you can override the DNS server settings which are advertised by the router. If your openSPOT can’t connect to a server (for ex. after switching D-STAR reflectors from your radio), you can try overriding the DNS servers to 8.8.8.8 and 8.8.4.4
Voice announcement settings
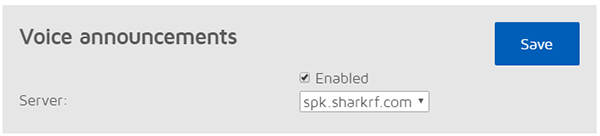
openSPOT has an own voice announcement system. It’s source code is available on GitHub. In DMR mode, voice announcements are sent to TG9, so to hear them, make sure you have TG9 in your radio’s RX group list.
If you turn on advanced mode, you’ll be able to change the following settings:
- You can shorten BrandMeister announcements, if you don’t want to hear the linked reflector/talkgroups list.
- You can set your own voice announcement server’s host and port.
- You can set openSPOT to use voice announcements only from the specified server (startup voice announcements played right after openSPOT boots will still be played from openSPOT’s flash memory).
- You can change the source DMR ID of the voice announcements.
- You can change the Profile query/change base DMR ID. See the description of config profile settings above for more info about this.
- You can change the Connector query DMR ID. See the description of config profile settings above for more info about this.
Location settings
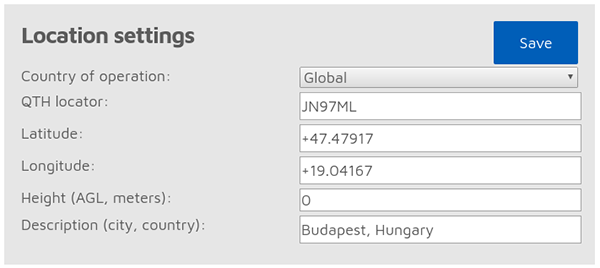
Setting location data is optional, it is used by some connectors like Homebrew to report the location of openSPOT to the connector’s network.
DMR settings

– Color code: DMR frames with this color code will be processed only.
– Default ID for C4FM calls: if the source callsign of the C4FM call can’t be parsed into a number, this ID will be used for the outgoing DMR call. If you are the only person using openSPOT, set this to your DMR ID, and then you don’t need to change the callsign of your C4FM radio to your DMR ID.
– Allow only DMR IDs as C4FM callsigns: ignore calls coming from a C4FM radio with source callsigns not set to a DMR ID.
– Send no in-band data to network: if you enable this, in-band data coming from your radio like talker alias or in-band GPS position information won’t be sent to the network.
– Force talker alias to DMR network: this talker alias will be sent for all calls coming from your radio (if your radio is already sending a talker alias to openSPOT, this setting will overwrite that).
– Send no in-band data to modem: if your radio has issues decoding voice calls containing in-band data like talker alias or in-band GPS position information, enable this setting. This will filter all in-band data for calls coming from the network. By default this setting is enabled – if you have a radio which supports talker alias decoding (like Hyteras with at least v8 firmwares), turn off this setting to let openSPOT pass through in-band data to your radio.
If you turn advanced mode on, you’ll be able to change the following settings:
- Echo ID: if the currently active connector supports it, you start a call to this DMR ID. openSPOT records the call and plays it back when the call is finished. By default it is set to ID 9999.
- Transmit idle in BS mode idle TX slot: in DMR/BS mode, when only one of the TDMA channels are in a call, the modem will transmit idle frames in the other, unused TDMA slots. Note that keeping this on improves call quality.
D-STAR settings
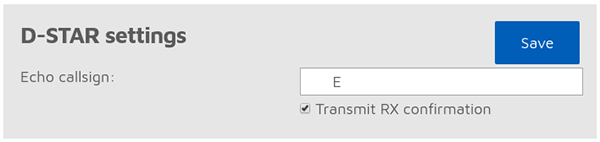
This block is only available in advanced mode.
- Echo callsign: if the currently active D-STAR connector supports it, you start a call to this callsign, openSPOT records the call and plays it back when the call is finished.
- Transmit RX confirmation: openSPOT will transmit a call confirmation after the PTT is released on the D-STAR radio.
C4FM settings
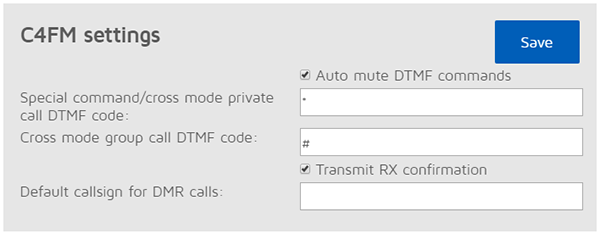
This block is only available in advanced mode.
- Auto mute DTMF commands: if a DTMF sequence is being entered, and the first character is a Special command or cross mode group call DTMF character, the outgoing call will be automatically ended, so DTMF tones won’t annoy other users on the same reflector/talkgroup.
- Special command/cross mode private call DTMF code: this code is used as the first character for querying active profile info, changing profiles, querying active connector info, or starting a private call. See more info in the connectors section, or at the Config profile settings section.
- Cross mode group call DTMF code: this code is used by DMR connectors which support cross modem mode to start group calls. See more info in the connectors section.
- Transmit RX confirmation: openSPOT will transmit a call confirmation after the PTT is released on the C4FM radio.
- Default callsign for DMR calls: this callsign will be used on C4FM networks for calls coming from a DMR radio instead the DMR radio’s ID until a valid DMR talker alias is decoded. After that, the talker alias is used as the source callsign.
- Only receive SQL code from modem: when this is checked, the openSPOT will only receive calls with the SQL code set at “SQL code from modem”.
- Replace SQL code to modem enabled: when this is checked, the openSPOT will replace squelch codes in packets received from the network to the value set at “Replace SQL code to modem”, so they will be transmitted by the modem with this new squelch code value.
- Replace SQL code to net enabled: when this is checked, the openSPOT will replace squelch codes in packets received by the modem to the value set at “Replace SQL code to net”, so they will be sent to the network with this new squelch code value.
Lock settings
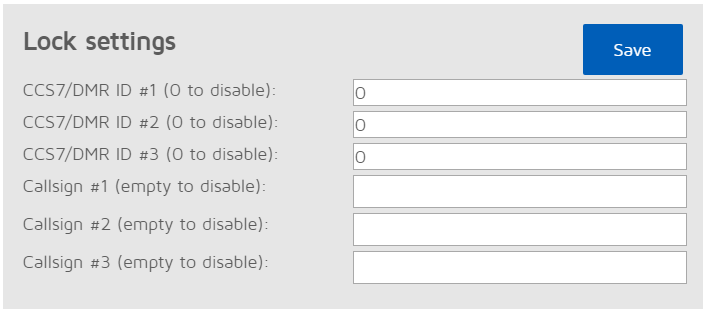
This block is only available in advanced mode. It allows you to lock openSPOT to the given CCS7/DMR IDs and/or callsigns. If lock is enabled, openSPOT’s modem will only allow calls originating from the given IDs or callsigns.
Reboot/reset config

– Reboot button: reboots openSPOT
– Reboot to bootloader button: reboots openSPOT and it will automatically enter into bootloader mode. Note that after 1 minute of inactivity, bootloader will exit and starts the application, so it won’t be stuck there.
– Reset config button: you can reset all settings to the defaults.
Using cross modem modes
Using a DMR connector with a C4FM radio
After you’ve switched to the given DMR connector, make sure that the modem is in C4FM mode. Only calls in DN (Digital Narrow) mode will be converted, if you transmit in other modes, DMR users will only hear silence.
- The source DMR ID of your calls from the C4FM radio will be set to the Default DMR ID for C4FM calls (Settings page, DMR settings section). You can set this to your DMR ID.
- If you set your DMR ID as your callsign in your C4FM radio, it will be used as the source DMR ID instead of the default ID.
- The callsign of incoming DMR calls will be set to the Default callsign for DMR calls (Settings page, C4FM settings section). If it’s not set, the callsign will be the source DMR ID as text.
Using a C4FM connector with a DMR radio
After you’ve switched to the given C4FM connector, make sure that the modem is in DMR/Hotspot mode. Only calls in DN (Digital Narrow) mode will be converted to your DMR radio, if someone transmits in other modes on the C4FM network, you will hear silence on your DMR radio.
- Your outgoing callsign will be the Default callsign for DMR calls (Settings page, C4FM setting section). If this is not set, your outgoing callsign will be your radio’s DMR ID.
- If an incoming call’s source callsign can be parsed into a number, it will be it’s source DMR ID. Otherwise the Default DMR ID for C4FM calls setting will be used (Settings page, DMR settings section).
Serial console
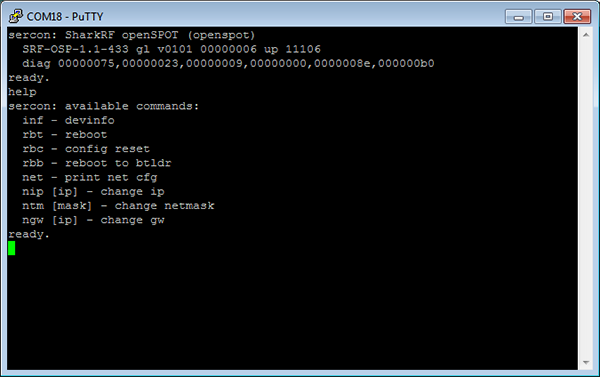
openSPOT shows up as a USB serial port (COM port) if you plug it in your computer. You can reach the serial console by opening this USB serial port with a serial terminal software like PuTTY, RealTerm, TeraTerm, minicom etc. To find out which is your openSPOT’s serial port device path (COM port number), look at the devices list of your computer (in your operating system’s control panel for example). Use the following settings for opening the serial port: baud rate 115200 (should work with any other value), 8 data bits, no parity bits, 1 stop bit.
openSPOT’s serial console does not require drivers on modern operating systems, as it shows up as a standard USB ACM device with our official USB ID 0x1fc9:0x8125. You can download a driver for Windows XP, 7 and Vista here. Some users reported that Windows 8.1 also requires this driver, but it can only be installed if the signed driver requirement is turned off.
The serial console can be used to change basic network settings, reboot openSPOT, switch it to bootloader mode, see it’s debug log, reset web interface password any many more. The list of available commands can be queried with the help command.
Using the openSPOT API
You can use both an HTTP and a UDP application programming interface to develop your own applications which use openSPOT.
You can find more information about the API protocols on our GitHub pages:
Acknowledgement
Thanks to our alpha testers for their continuous work: István Száraz HA7PTY, Lajos Horváth HA5OGR, and to everyone who use beta firmwares and help us finding bugs by reporting them on the openSPOT community forum!
Troubleshooting
If you have problems using openSPOT please ask your questions on the openSPOT troubleshooting forum.
Specifications
- Dimensions: 71 x 67 x 31 mm (without antenna)
- Weight: 150 gr (without antenna)
- Operating temperature range: -40 – +85 C
- Power supply: 5 V DC through the USB port.
- Power consumption: max. 210 mA @ 5 V (1.05 W)
- Antenna impedance: 50 Ω
- RF power output: max. 13 dBm (20 mW)
- Receive/transmit frequency range: 421-458 MHz (JP version: 430-440MHz, TW version: 430-432MHz)
- Receiver sensitivity:
- Gaussian 2FSK: -114 dBm @ 9.6 kbps
- Raised Cosine 4FSK: -109 dBm @ 9.6 kbps
- Emission designators: A1A (CW ID), F1E/F1D (D-STAR, System Fusion), FXE, FXD (DMR)
The data sheet which can be used to apply for usage permit in Japan is available for download here.
Further information
Please ask your further questions on the openSPOT community forum.
Open source licences
Here are the licences for various open source software used in openSPOT.
alertify.js
The MIT License
Copyright (c) 2009-2014 Stuart Knightley, David Duponchel, Franz Buchinger, António Afonso
Permission is hereby granted, free of charge, to any person obtaining a copy of this software and associated documentation files (the “Software”), to deal in the Software without restriction, including without limitation the rights to use, copy, modify, merge, publish, distribute, sublicense, and/or sell copies of the Software, and to permit persons to whom the Software is furnished to do so, subject to the following conditions:
The above copyright notice and this permission notice shall be included in all copies or substantial portions of the Software.
THE SOFTWARE IS PROVIDED “AS IS”, WITHOUT WARRANTY OF ANY KIND, EXPRESS OR IMPLIED, INCLUDING BUT NOT LIMITED TO THE WARRANTIES OF MERCHANTABILITY, FITNESS FOR A PARTICULAR PURPOSE AND NONINFRINGEMENT. IN NO EVENT SHALL THE AUTHORS OR COPYRIGHT HOLDERS BE LIABLE FOR ANY CLAIM, DAMAGES OR OTHER LIABILITY, WHETHER IN AN ACTION OF CONTRACT, TORT OR OTHERWISE, ARISING FROM, OUT OF OR IN CONNECTION WITH THE SOFTWARE OR THE USE OR OTHER DEALINGS IN THE SOFTWARE.
balloon.css
The MIT License (MIT)
Copyright (c) 2016 Claudio Holanda
Permission is hereby granted, free of charge, to any person obtaining a copy
of this software and associated documentation files (the “Software”), to deal
in the Software without restriction, including without limitation the rights
to use, copy, modify, merge, publish, distribute, sublicense, and/or sell
copies of the Software, and to permit persons to whom the Software is
furnished to do so, subject to the following conditions:
The above copyright notice and this permission notice shall be included in all
copies or substantial portions of the Software.
THE SOFTWARE IS PROVIDED “AS IS”, WITHOUT WARRANTY OF ANY KIND, EXPRESS OR
IMPLIED, INCLUDING BUT NOT LIMITED TO THE WARRANTIES OF MERCHANTABILITY,
FITNESS FOR A PARTICULAR PURPOSE AND NONINFRINGEMENT. IN NO EVENT SHALL THE
AUTHORS OR COPYRIGHT HOLDERS BE LIABLE FOR ANY CLAIM, DAMAGES OR OTHER
LIABILITY, WHETHER IN AN ACTION OF CONTRACT, TORT OR OTHERWISE, ARISING FROM,
OUT OF OR IN CONNECTION WITH THE SOFTWARE OR THE USE OR OTHER DEALINGS IN THE
SOFTWARE.
contour.js
Copyright 2016 Forio Contour
Licensed under the Apache License, Version 2.0 (the “License”); you may not use this file except in compliance with the License. You may obtain a copy of the License at
http://www.apache.org/licenses/LICENSE-2.0
Unless required by applicable law or agreed to in writing, software distributed under the License is distributed on an “AS IS” BASIS, WITHOUT WARRANTIES OR CONDITIONS OF ANY KIND, either express or implied. See the License for the specific language governing permissions and limitations under the License.
d3.js
Copyright 2010-2016 Mike Bostock
All rights reserved.
Redistribution and use in source and binary forms, with or without modification,
are permitted provided that the following conditions are met:
- Redistributions of source code must retain the above copyright notice, this
list of conditions and the following disclaimer. -
Redistributions in binary form must reproduce the above copyright notice,
this list of conditions and the following disclaimer in the documentation
and/or other materials provided with the distribution. -
Neither the name of the author nor the names of contributors may be used to
endorse or promote products derived from this software without specific prior
written permission.
THIS SOFTWARE IS PROVIDED BY THE COPYRIGHT HOLDERS AND CONTRIBUTORS “AS IS” AND
ANY EXPRESS OR IMPLIED WARRANTIES, INCLUDING, BUT NOT LIMITED TO, THE IMPLIED
WARRANTIES OF MERCHANTABILITY AND FITNESS FOR A PARTICULAR PURPOSE ARE
DISCLAIMED. IN NO EVENT SHALL THE COPYRIGHT OWNER OR CONTRIBUTORS BE LIABLE FOR
ANY DIRECT, INDIRECT, INCIDENTAL, SPECIAL, EXEMPLARY, OR CONSEQUENTIAL DAMAGES
(INCLUDING, BUT NOT LIMITED TO, PROCUREMENT OF SUBSTITUTE GOODS OR SERVICES;
LOSS OF USE, DATA, OR PROFITS; OR BUSINESS INTERRUPTION) HOWEVER CAUSED AND ON
ANY THEORY OF LIABILITY, WHETHER IN CONTRACT, STRICT LIABILITY, OR TORT
(INCLUDING NEGLIGENCE OR OTHERWISE) ARISING IN ANY WAY OUT OF THE USE OF THIS
SOFTWARE, EVEN IF ADVISED OF THE POSSIBILITY OF SUCH DAMAGE.
jquery.js
Permission is hereby granted, free of charge, to any person obtaining
a copy of this software and associated documentation files (the
“Software”), to deal in the Software without restriction, including
without limitation the rights to use, copy, modify, merge, publish,
distribute, sublicense, and/or sell copies of the Software, and to
permit persons to whom the Software is furnished to do so, subject to
the following conditions:
The above copyright notice and this permission notice shall be
included in all copies or substantial portions of the Software.
THE SOFTWARE IS PROVIDED “AS IS”, WITHOUT WARRANTY OF ANY KIND,
EXPRESS OR IMPLIED, INCLUDING BUT NOT LIMITED TO THE WARRANTIES OF
MERCHANTABILITY, FITNESS FOR A PARTICULAR PURPOSE AND
NONINFRINGEMENT. IN NO EVENT SHALL THE AUTHORS OR COPYRIGHT HOLDERS BE
LIABLE FOR ANY CLAIM, DAMAGES OR OTHER LIABILITY, WHETHER IN AN ACTION
OF CONTRACT, TORT OR OTHERWISE, ARISING FROM, OUT OF OR IN CONNECTION
WITH THE SOFTWARE OR THE USE OR OTHER DEALINGS IN THE SOFTWARE.
ladda.js
Copyright (C) 2016 Hakim El Hattab, http://hakim.se
Permission is hereby granted, free of charge, to any person obtaining a copy
of this software and associated documentation files (the “Software”), to deal
in the Software without restriction, including without limitation the rights
to use, copy, modify, merge, publish, distribute, sublicense, and/or sell
copies of the Software, and to permit persons to whom the Software is
furnished to do so, subject to the following conditions:
The above copyright notice and this permission notice shall be included in
all copies or substantial portions of the Software.
THE SOFTWARE IS PROVIDED “AS IS”, WITHOUT WARRANTY OF ANY KIND, EXPRESS OR
IMPLIED, INCLUDING BUT NOT LIMITED TO THE WARRANTIES OF MERCHANTABILITY,
FITNESS FOR A PARTICULAR PURPOSE AND NONINFRINGEMENT. IN NO EVENT SHALL THE
AUTHORS OR COPYRIGHT HOLDERS BE LIABLE FOR ANY CLAIM, DAMAGES OR OTHER
LIABILITY, WHETHER IN AN ACTION OF CONTRACT, TORT OR OTHERWISE, ARISING FROM,
OUT OF OR IN CONNECTION WITH THE SOFTWARE OR THE USE OR OTHER DEALINGS IN
THE SOFTWARE.
lodash.js
Permission is hereby granted, free of charge, to any person obtaining
a copy of this software and associated documentation files (the
“Software”), to deal in the Software without restriction, including
without limitation the rights to use, copy, modify, merge, publish,
distribute, sublicense, and/or sell copies of the Software, and to
permit persons to whom the Software is furnished to do so, subject to
the following conditions:
The above copyright notice and this permission notice shall be
included in all copies or substantial portions of the Software.
THE SOFTWARE IS PROVIDED “AS IS”, WITHOUT WARRANTY OF ANY KIND,
EXPRESS OR IMPLIED, INCLUDING BUT NOT LIMITED TO THE WARRANTIES OF
MERCHANTABILITY, FITNESS FOR A PARTICULAR PURPOSE AND
NONINFRINGEMENT. IN NO EVENT SHALL THE AUTHORS OR COPYRIGHT HOLDERS BE
LIABLE FOR ANY CLAIM, DAMAGES OR OTHER LIABILITY, WHETHER IN AN ACTION
OF CONTRACT, TORT OR OTHERWISE, ARISING FROM, OUT OF OR IN CONNECTION
WITH THE SOFTWARE OR THE USE OR OTHER DEALINGS IN THE SOFTWARE.
pure.css
Copyright 2013 Yahoo! Inc. All rights reserved.
Redistribution and use in source and binary forms, with or without modification, are permitted provided that the following conditions are met:
- Redistributions of source code must retain the above copyright
notice, this list of conditions and the following disclaimer. -
Redistributions in binary form must reproduce the above copyright
notice, this list of conditions and the following disclaimer in the
documentation and/or other materials provided with the distribution. -
Neither the name of the Yahoo! Inc. nor the
names of its contributors may be used to endorse or promote products
derived from this software without specific prior written permission.
THIS SOFTWARE IS PROVIDED BY THE COPYRIGHT HOLDERS AND CONTRIBUTORS “AS IS” AND ANY EXPRESS OR IMPLIED WARRANTIES, INCLUDING, BUT NOT LIMITED TO, THE IMPLIED WARRANTIES OF MERCHANTABILITY AND FITNESS FOR A PARTICULAR PURPOSE ARE DISCLAIMED. IN NO EVENT SHALL YAHOO! INC. BE LIABLE FOR ANY DIRECT, INDIRECT, INCIDENTAL, SPECIAL, EXEMPLARY, OR CONSEQUENTIAL DAMAGES (INCLUDING, BUT NOT LIMITED TO, PROCUREMENT OF SUBSTITUTE GOODS OR SERVICES; LOSS OF USE, DATA, OR PROFITS; OR BUSINESS INTERRUPTION) HOWEVER CAUSED AND ON ANY THEORY OF LIABILITY, WHETHER IN CONTRACT, STRICT LIABILITY, OR TORT (INCLUDING NEGLIGENCE OR OTHERWISE) ARISING IN ANY WAY OUT OF THE USE OF THIS SOFTWARE, EVEN IF ADVISED OF THE POSSIBILITY OF SUCH DAMAGE.
js-sha256.js
Copyright (c) 2015 Chen Yi-Cyuan
MIT License
Permission is hereby granted, free of charge, to any person obtaining
a copy of this software and associated documentation files (the
“Software”), to deal in the Software without restriction, including
without limitation the rights to use, copy, modify, merge, publish,
distribute, sublicense, and/or sell copies of the Software, and to
permit persons to whom the Software is furnished to do so, subject to
the following conditions:
The above copyright notice and this permission notice shall be
included in all copies or substantial portions of the Software.
THE SOFTWARE IS PROVIDED “AS IS”, WITHOUT WARRANTY OF ANY KIND,
EXPRESS OR IMPLIED, INCLUDING BUT NOT LIMITED TO THE WARRANTIES OF
MERCHANTABILITY, FITNESS FOR A PARTICULAR PURPOSE AND
NONINFRINGEMENT. IN NO EVENT SHALL THE AUTHORS OR COPYRIGHT HOLDERS BE
LIABLE FOR ANY CLAIM, DAMAGES OR OTHER LIABILITY, WHETHER IN AN ACTION
OF CONTRACT, TORT OR OTHERWISE, ARISING FROM, OUT OF OR IN CONNECTION
WITH THE SOFTWARE OR THE USE OR OTHER DEALINGS IN THE SOFTWARE.
spin.js
The MIT License
Copyright (c) 2011-2015 Felix Gnass [fgnass at gmail dot com]
Permission is hereby granted, free of charge, to any person obtaining a copy of this software and associated documentation files (the “Software”), to deal in the Software without restriction, including without limitation the rights to use, copy, modify, merge, publish, distribute, sublicense, and/or sell copies of the Software, and to permit persons to whom the Software is furnished to do so, subject to the following conditions:
The above copyright notice and this permission notice shall be included in all copies or substantial portions of the Software.
THE SOFTWARE IS PROVIDED “AS IS”, WITHOUT WARRANTY OF ANY KIND, EXPRESS OR IMPLIED, INCLUDING BUT NOT LIMITED TO THE WARRANTIES OF MERCHANTABILITY, FITNESS FOR A PARTICULAR PURPOSE AND NONINFRINGEMENT. IN NO EVENT SHALL THE AUTHORS OR COPYRIGHT HOLDERS BE LIABLE FOR ANY CLAIM, DAMAGES OR OTHER LIABILITY, WHETHER IN AN ACTION OF CONTRACT, TORT OR OTHERWISE, ARISING FROM, OUT OF OR IN CONNECTION WITH THE SOFTWARE OR THE USE OR OTHER DEALINGS IN THE SOFTWARE.
sha2.c
/*
* FILE: sha2.c
* AUTHOR: Aaron D. Gifford – http://www.aarongifford.com/
*
* Copyright (c) 2000-2001, Aaron D. Gifford
* All rights reserved.
*
* Redistribution and use in source and binary forms, with or without
* modification, are permitted provided that the following conditions
* are met:
* 1. Redistributions of source code must retain the above copyright
* notice, this list of conditions and the following disclaimer.
* 2. Redistributions in binary form must reproduce the above copyright
* notice, this list of conditions and the following disclaimer in the
* documentation and/or other materials provided with the distribution.
* 3. Neither the name of the copyright holder nor the names of contributors
* may be used to endorse or promote products derived from this software
* without specific prior written permission.
*
* THIS SOFTWARE IS PROVIDED BY THE AUTHOR AND CONTRIBUTOR(S) “AS IS” AND
* ANY EXPRESS OR IMPLIED WARRANTIES, INCLUDING, BUT NOT LIMITED TO, THE
* IMPLIED WARRANTIES OF MERCHANTABILITY AND FITNESS FOR A PARTICULAR PURPOSE
* ARE DISCLAIMED. IN NO EVENT SHALL THE AUTHOR OR CONTRIBUTOR(S) BE LIABLE
* FOR ANY DIRECT, INDIRECT, INCIDENTAL, SPECIAL, EXEMPLARY, OR CONSEQUENTIAL
* DAMAGES (INCLUDING, BUT NOT LIMITED TO, PROCUREMENT OF SUBSTITUTE GOODS
* OR SERVICES; LOSS OF USE, DATA, OR PROFITS; OR BUSINESS INTERRUPTION)
* HOWEVER CAUSED AND ON ANY THEORY OF LIABILITY, WHETHER IN CONTRACT, STRICT
* LIABILITY, OR TORT (INCLUDING NEGLIGENCE OR OTHERWISE) ARISING IN ANY WAY
* OUT OF THE USE OF THIS SOFTWARE, EVEN IF ADVISED OF THE POSSIBILITY OF
* SUCH DAMAGE.
*
*/
heatshrink
Copyright (c) 2013-2015, Scott Vokes ([email protected])
All rights reserved.
Permission to use, copy, modify, and/or distribute this software for any
purpose with or without fee is hereby granted, provided that the above
copyright notice and this permission notice appear in all copies.
THE SOFTWARE IS PROVIDED “AS IS” AND THE AUTHOR DISCLAIMS ALL WARRANTIES
WITH REGARD TO THIS SOFTWARE INCLUDING ALL IMPLIED WARRANTIES OF
MERCHANTABILITY AND FITNESS. IN NO EVENT SHALL THE AUTHOR BE LIABLE FOR
ANY SPECIAL, DIRECT, INDIRECT, OR CONSEQUENTIAL DAMAGES OR ANY DAMAGES
WHATSOEVER RESULTING FROM LOSS OF USE, DATA OR PROFITS, WHETHER IN AN
ACTION OF CONTRACT, NEGLIGENCE OR OTHER TORTIOUS ACTION, ARISING OUT OF
OR IN CONNECTION WITH THE USE OR PERFORMANCE OF THIS SOFTWARE.
jsmn
Copyright (c) 2010 Serge A. Zaitsev
Permission is hereby granted, free of charge, to any person obtaining a copy
of this software and associated documentation files (the “Software”), to deal
in the Software without restriction, including without limitation the rights
to use, copy, modify, merge, publish, distribute, sublicense, and/or sell
copies of the Software, and to permit persons to whom the Software is
furnished to do so, subject to the following conditions:
The above copyright notice and this permission notice shall be included in
all copies or substantial portions of the Software.
THE SOFTWARE IS PROVIDED “AS IS”, WITHOUT WARRANTY OF ANY KIND, EXPRESS OR
IMPLIED, INCLUDING BUT NOT LIMITED TO THE WARRANTIES OF MERCHANTABILITY,
FITNESS FOR A PARTICULAR PURPOSE AND NONINFRINGEMENT. IN NO EVENT SHALL THE
AUTHORS OR COPYRIGHT HOLDERS BE LIABLE FOR ANY CLAIM, DAMAGES OR OTHER
LIABILITY, WHETHER IN AN ACTION OF CONTRACT, TORT OR OTHERWISE, ARISING FROM,
OUT OF OR IN CONNECTION WITH THE SOFTWARE OR THE USE OR OTHER DEALINGS IN
THE SOFTWARE.
HamGridSquare.js
// Copyright 2014 Paul Brewer KI6CQ
// License: MIT License http://opensource.org/licenses/MIT or CC-BY-SA
//
// Javascript routines to convert from lat-lon to Maidenhead Grid Squares
// typically used in Ham Radio Satellite operations and VHF Contests
//
// Inspired in part by K6WRU Walter Underwood’s python answer
// http://ham.stackexchange.com/a/244
// to this stack overflow question:
// How Can One Convert From Lat/Long to Grid Square
// http://ham.stackexchange.com/questions/221/how-can-one-convert-from-lat-long-to-grid-square
SpinKit
The MIT License (MIT)
Copyright (c) 2015 Tobias Ahlin
Permission is hereby granted, free of charge, to any person obtaining a copy of
this software and associated documentation files (the “Software”), to deal in
the Software without restriction, including without limitation the rights to
use, copy, modify, merge, publish, distribute, sublicense, and/or sell copies of
the Software, and to permit persons to whom the Software is furnished to do so,
subject to the following conditions:
The above copyright notice and this permission notice shall be included in all
copies or substantial portions of the Software.
THE SOFTWARE IS PROVIDED “AS IS”, WITHOUT WARRANTY OF ANY KIND, EXPRESS OR
IMPLIED, INCLUDING BUT NOT LIMITED TO THE WARRANTIES OF MERCHANTABILITY, FITNESS
FOR A PARTICULAR PURPOSE AND NONINFRINGEMENT. IN NO EVENT SHALL THE AUTHORS OR
COPYRIGHT HOLDERS BE LIABLE FOR ANY CLAIM, DAMAGES OR OTHER LIABILITY, WHETHER
IN AN ACTION OF CONTRACT, TORT OR OTHERWISE, ARISING FROM, OUT OF OR IN
CONNECTION WITH THE SOFTWARE OR THE USE OR OTHER DEALINGS IN THE SOFTWARE.
GetGitRevisionDescription.cmake
Original Author: 2009-2010 Ryan Pavlik [email protected], [email protected]
http://academic.cleardefinition.com
Iowa State University HCI Graduate Program/VRAC
Copyright Iowa State University 2009-2010.
Boost Software License – Version 1.0 – August 17th, 2003
Permission is hereby granted, free of charge, to any person or organization
obtaining a copy of the software and accompanying documentation covered by
this license (the “Software”) to use, reproduce, display, distribute,
execute, and transmit the Software, and to prepare derivative works of the
Software, and to permit third-parties to whom the Software is furnished to
do so, all subject to the following:
The copyright notices in the Software and this entire statement, including
the above license grant, this restriction and the following disclaimer,
must be included in all copies of the Software, in whole or in part, and
all derivative works of the Software, unless such copies or derivative
works are solely in the form of machine-executable object code generated by
a source language processor.
THE SOFTWARE IS PROVIDED “AS IS”, WITHOUT WARRANTY OF ANY KIND, EXPRESS OR
IMPLIED, INCLUDING BUT NOT LIMITED TO THE WARRANTIES OF MERCHANTABILITY,
FITNESS FOR A PARTICULAR PURPOSE, TITLE AND NON-INFRINGEMENT. IN NO EVENT
SHALL THE COPYRIGHT HOLDERS OR ANYONE DISTRIBUTING THE SOFTWARE BE LIABLE
FOR ANY DAMAGES OR OTHER LIABILITY, WHETHER IN CONTRACT, TORT OR OTHERWISE,
ARISING FROM, OUT OF OR IN CONNECTION WITH THE SOFTWARE OR THE USE OR OTHER
DEALINGS IN THE SOFTWARE.